

can be used for the project.
In preparing this article I realized that it's pretty simple to click a button and instantly buy a set (or several sets) of horseshoes for your model horses in a flash from an online source. Horseshoes aren't all that expensive and I would imagine they come pretty quick with shipping times being spot on these days. But, what if you don't want to wait for an order or more importantly, don't really have the money to buy them or you don't want to spend money on shoes?
This a good time to go old school.

on white paper.

and onto the traced hoof outline.
Way back in the day we didn't have online sources to buy cool model horse...everything. We had to use whatever our dads or moms or caretakers had lying around in a cellar, work space, or kitchen.
I learned pretty early on that I loved seeing my studs with shoes on their hooves and I snagged a spare roll of my father's solder wire. As a matter of fact, with that worn out "Radio Shack" label on the one pictured here, you can tell Im still using the SAME wire I used as a kid! This stuff is fairly cheap and it goes a long way.
Where do you buy it? Check your local Walmart or Home Depot. Home supply stores will definitely have this item and I like to use the thicker wire and then cut or sand the shape down later.

hammer down the wire.
Overall, the process is pretty simple.
1). Trace your horse's hoof shape out on a piece of paper.
2). Bend the wire over the tracings (this will also help you keep track of which shoe goes to which hoof) and cut.
3). Hammer the wire on something very solid like a brick. Do this carefully.
This wire will really flatten! You can see that in the photos, and it may be off-putting to many, but on this Halla custom it doesn't matter that there is excess on the bottom because it won't be seen. Now, if you do have a horse whose leg is raised and the underside of the hoof viewable, you will have to get creative and Dremel shape into the shoe. But, don't let it discourage you, this wire is very soft and it won't take long to get what you want visually.
4). After the shoe is flattened, use a glue such as Crazy Glue or Sinbad glue and adhere the hoof to the shoe. NOW, at this stage I let the shoe rest overnight, or at least for a few hours before Dremeling. If the glue hasn't set the shoe will pop off from the vibration.

and flattens fast.

hoof using Crazy Glue or Sinbad
(as pictured).

very large shoes.
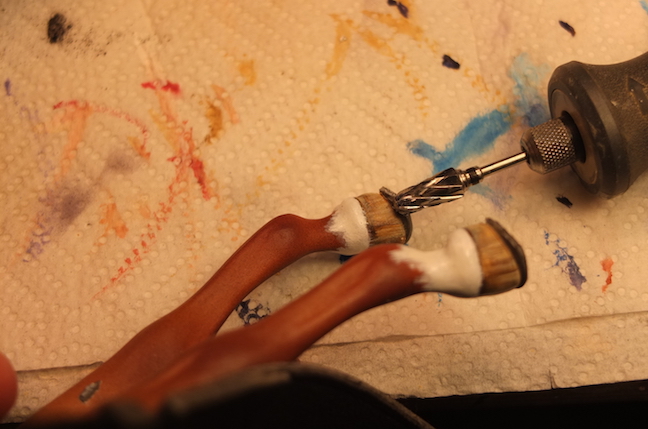
Lastly, Dremel away all the excess. You can see I left a lot of excess, but I prefer to work this way so that the shoe is nice and flush against the hoof. Yes, the hoof may get damaged in this process of sanding, but it's easy enough to repaint. Lastly, add some nail heads and shine up the hooves with a gloss medium.
Your horse is now shod.


No comments:
Post a Comment