Monday, April 12, 2021

The Creation of "Bella"

"Bella Il Maré-Determination"
Currently on exhibit at The Small Favors 2021 show
in Philadelphia, PA


The creation of "Bella" went through a wild transformation.  I started documenting her creation and early on hit some snags.  From measurements being incorrect, to the paper armature giving me issue in the muzzle, she quickly became a difficult piece to work on and I was determined to see her to fruition.  In the end, I was extremely happy with her final outcome. Her acceptance into the "Small Favors 2021" exhibit was amazingly exciting for me. 

As this exhibit is coming to a close, I wanted to share the documentation.  She was very much like a mare throughout, but she eventually gave in.

She was sculpted using cone 6 white stoneware, which is a very lovely and creamy clay for both hand building and wheel throwing.  I have used both Amaco and Mayco commercial glazes on this piece. 

Here is her transformation:


Starting to build the clay around a paper armature.
 

Getting things in their proper place.


Adding bone and muscle structure.


Very excited about the idea and flow, so I 
added a mane prematurely.


At this stage I have captured the "spirit"
of the drawing, but thinsg are off so I start
taking measurements and they are very off.


Off with her muzzle!


It took many tries, but the piece 
started to feel and look better.


Refining all the changes.


Adding seashells and a windswept mane to
the bottom.  The piece was now at the "leather hard" stage
and I could carve and smooth to my heart's content.  


The finished sculpture.


The other side.


Close up of the glaze effect around her base.  I was thrilled when I opened the 
kiln and saw this all came out as I had envisioned 


Tuesday, February 2, 2021

Rock It!

Dot painting warm ups
Sooo.....

It's day 2 of NaMoPaiMo and you're watching everyone sharing their first layers of paint on their ponies, but you're still staring at your prepped pony. You're physically ready, but mentally something has it's grip on you. You just can't seem to start. How do you combat this mental struggle? 
 
Rock it....or craft it....or just doodle it out!
 
Sounds silly at first, but if you were a musician, even a beginner, the routine of warming up with playing simple scales would be the very first thing you would do with your instrument.  If you were competing in a sporting event the very first thing you would do before the competition would be to stretch so your muscles would warm up and be fit and ready for the sport. 

Creating art is no different in that you need to warm up your mind and hands so they are working together for you. Some days, they just don't want to work together and they need a little push.  The simplest way to give your instruments of art the push they need is to just doodle with paint or a pen.  The act of pushing around paint on a surface that has no emotional value to you, gets juices flowing without any expectations.  


Simple paint lines on paper.  Warm ups

Now, you may find that after 15 minutes of pushing paint about on paper hasn't done a thing for you.  That's ok.  Some creative blocks take patience and consistency to undo sometimes.  Come back the following day and create your lines on paper with no expectations.  Start adding paint to inanimate objects like found rocks.  The paint lines or dots are a commitment, but the object isn't pulling at your heart strings.  

For me, the dots on rocks helps a great deal and I find I get lost in the joy of the process.  This act of "doing" usually results in wanting to do more as the creative juices fire up in the brain.  The moment you feel your brain "fire up"  is when you should jump in and begin your horse.  

Ultimately, it's about enjoying the process and we have to warm up first and remind our brains that the process will be fun.

Cheers to a great month of NaMoPaiMo fun and discovery! Go forward and rock it!


Sunday, March 22, 2020

Oh NO! They Are Out Of Soup!!!

Prepping the ends of a cabbage
for the "freezer bag".

I had the great fortune of spending most of my summers with my grandmother who was a teenager during the Great Depression. I spent endless summer days with her learning how to plant and weed a garden. I learned how to turn a little bit of flour, water and egg into noodles and pierogi dough and she showed me that the simplest of items could turn into amazingly yummy desserts with just a little elbow grease and love.

These lessons proved to be helpful during my college years, and during the "working in the rat race" years and now, the lessons she taught are coming in hand as the world is experiencing a virus that is halting so much of our lives and what we take for granted.

In the last few days I have read more than a dozen people expressing their nervousness online about the lack of canned goods on the store shelves. In particular, they were stunned by the lack of soups and soup stocks for sale. The cans and boxes had all been purchased leaving the shelves bare and in hearing the panic in their posts I felt maybe it might be useful to share what I learned from gramma.

I will be honest with you, the thought of buying canned soup from a store shelf is a horrid thought to me. Spending hard earned money on boxed stock is a NO GO for this gal. For me, its homemade or nothing.

Ok, I heard a few groans as I mentioned the word, "homemade" in the last paragraph. I know, no one likes to fuss, and anything "homemade" seems to have a fuss about it, but this soup stock isn't fussy, and as we have nothing but time TO fuss, why not give this simple veggie stock recipe a try. Honestly, you already have everything you need to make it. Sadly, you're probably throwing all that you need away.

Huge freezer bag full of veggie
scraps that are ready for boiling.

Big bag of veggie scraps.


Every potato you peel, every carrot you cut the ends off of and every celery end you want to toss, needs to go into a big freezer bag. That freezer bag is then placed in your freezer and every time you peel a carrot for a salad or peel potatoes for dinner all the peelings go into the freezer bag and held till the bag is full. Once that bag is full you can slowly boil all those peelings in a 8 quart pot of water for a few hours which creates a nice veggie stock.

That's it!

Seriously, that is how one makes vegetable stock. After about 2-3 hours of slowly simmering the peelings will be mush, but all the nutrient and taste will be in the now veggie stock. I like to add a little bullion cube (either chicken or beef, but veggie bullion can be added) just to give the stock an added boost of flavor.

After 2-3 hours of slow simmer the veggie peels can be removed and discarded. You'll be left with a delicious vegetable stock base for pretty much any type of soup you'd like to make and an 8 quart pot goes a long way. The liquid can be frozen and used later. From this point, the stock is the base for amazing soups. Add meat, add noodles, add more veggies for a wonderfully full and delicious soup.

So don't waste those peelings. Let them work for you in a delicious and easy veggie stock. If feeling adventurous, save shrimp shells (yep...dont discard those!) or lobster or clam shells in the freezer too and when a bag is full boil those up to make an amazingly homemade seafood stock. From there you can make an amazing bisque!

Did you buy a huge froze turkey cause that's all they had at the store the day you went looking for meat? Bonsai! You not only have enough meat to feed a small army you now have a turkey carcass which will boil down using this method to a simply decadent turkey stock soup. If you are throwing away your carcass after your meal you are seriously missing out on good food.

It all starts with the stock.


8 quart soup pot with colander
works great for making stocks from discarded peelings.


If you feel the stock needs a little "boost"
just add some bullion. One or two is perfect.

Me and my beautiful grandma
on my graduation day from Pratt Institute.

Wednesday, February 26, 2020

Old School Shoes

Solder wire of varying thickness
can be used for the project.

In preparing this article I realized that it's pretty simple to click a button and instantly buy a set (or several sets) of horseshoes for your model horses in a flash from an online source. Horseshoes aren't all that expensive and I would imagine they come pretty quick with shipping times being spot on these days. But, what if you don't want to wait for an order or more importantly, don't really have the money to buy them or you don't want to spend money on shoes?

This a good time to go old school.

Trace the horse's hoof
on white paper.


Bend the wire around
and onto the traced hoof outline.


Way back in the day we didn't have online sources to buy cool model horse...everything. We had to use whatever our dads or moms or caretakers had lying around in a cellar, work space, or kitchen.

I learned pretty early on that I loved seeing my studs with shoes on their hooves and I snagged a spare roll of my father's solder wire. As a matter of fact, with that worn out "Radio Shack" label on the one pictured here, you can tell Im still using the SAME wire I used as a kid! This stuff is fairly cheap and it goes a long way.

Where do you buy it? Check your local Walmart or Home Depot. Home supply stores will definitely have this item and I like to use the thicker wire and then cut or sand the shape down later.

Using a hammer and a brick
hammer down the wire.

Overall, the process is pretty simple.

1). Trace your horse's hoof shape out on a piece of paper.
2). Bend the wire over the tracings (this will also help you keep track of which shoe goes to which hoof) and cut.
3). Hammer the wire on something very solid like a brick. Do this carefully.

This wire will really flatten! You can see that in the photos, and it may be off-putting to many, but on this Halla custom it doesn't matter that there is excess on the bottom because it won't be seen. Now, if you do have a horse whose leg is raised and the underside of the hoof viewable, you will have to get creative and Dremel shape into the shoe. But, don't let it discourage you, this wire is very soft and it won't take long to get what you want visually.

4). After the shoe is flattened, use a glue such as Crazy Glue or Sinbad glue and adhere the hoof to the shoe. NOW, at this stage I let the shoe rest overnight, or at least for a few hours before Dremeling. If the glue hasn't set the shoe will pop off from the vibration.


The wire hammers easily
and flattens fast.


Glue the flattened shoe onto the
hoof using Crazy Glue or Sinbad
(as pictured).


All four hooves have
very large shoes.


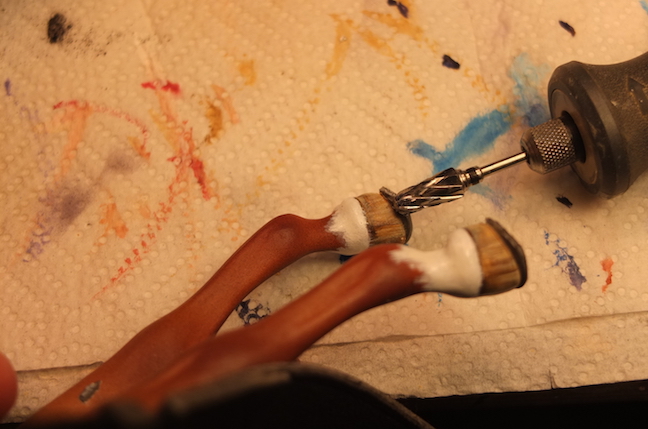
Carefully Dremel the excess down.


Lastly, Dremel away all the excess. You can see I left a lot of excess, but I prefer to work this way so that the shoe is nice and flush against the hoof. Yes, the hoof may get damaged in this process of sanding, but it's easy enough to repaint. Lastly, add some nail heads and shine up the hooves with a gloss medium.

Your horse is now shod.

The end result looks lovely.

Time Warp


I think I went through a time warp. Last post here was from a year ago. How awful. Life has just been busy and my writing adventures have been done in private and quiet without public appearances. The one writing project is a hefty one weighing in at well over 20,000 words. That's a lot to say on paper. This project is also the main reason for me staying away from my blog. My silence probably have left those wondering if I had up and left for good or had gotten swallowed up by the fates. Neither. Ive just been real busy.

Wednesday, February 13, 2019

And....We're Off....With Instant Issues!

It's tradition here in my studio to start my NaMoPaiMo horse 2 weeks after the start of the event. I'm a bit of a procrastinator with my own projects and this one is no exception.

Part of my procrastination is not only gathering my thoughts on what I'm going to do and how to do it, it is also mixing the color in my head before I start, and clearing my work bench of pressing items so I can enjoy the process of creating my NaMoPaiMo horse.

My belief is if one isn't "in the moment" with art and enjoying the process, no matter how difficult a time it may be giving you, why is one doing the art? Seriously, one must always ask themselves that question if they are not having fun making art.

As is tradition, I started "Cerberus" 2 weeks late and as is also tradition I immediately had issues. The moment I put the first layers of acrylic on his body I saw I missed two areas while prepping. These were areas that needed attention quickly. In the past I've ignored such prep issues thinking I'd get to them "later" only to have them become bigger issues later. These were in crucial spots and they needed sanding. Once sanded, I was left with two huge white patches of exposed resin.


Two prepping issues sanded and smooth now.


So, you're probably asking, "Now what?"

A few of you might be in a similar situation and the first step is not to panic, but to remind yourself that as long as you can match the color you can cover it perfectly and hide the boo boo. This first step is key in hiding such a mark. Match the original base color and you'll never know.


For Pastels:
I water down gesso and apply to the sanded areas. Two or three smooth coats. If you find there is tooth left then take a very fine sandpaper and gently sand down just the gessoed areas to make it smooth. Wipe dust clean and then begin the process of pastelling from light to dark just in the marred areas till you reach the color of the rest of the horse. Keep adding dust till it eventually blends. This process is fairly lengthy with pastels, but it is totally doable. Have patience and don't give up.

For Acrylics:
The first thing I do is seal what Ive already painted in acrylics. Seal that good color up....boos and all. It's ok, remember, you'll be covering up the boo boos in no time and you want to protect all the good stuff you're already painted. Spray it and let it dry fully.

After everything is dry start mixing the base color and apply it directly ON the area that is good. (Remember the horse was protected so if the color you mixed isn't correct you can use a 50% rubbing alcohol to wipe the test brushstroke away without doing any damage.) Do this so you know you have an exact match of color. You may have just started painting and haven't mixed much of any color which makes covering even easier, but, if you are well into the painting production you will need to test match the color.

Once you have found the exact match then start covering up your boo boos. Start with light layers. The first layers won't cover. You will most likely need 10-15 layers of acrylics to hide the unwanted marks. If you are hand painting you will need to keep the layers watered down so strokes don't form.

The process will take a long time, but keep adding those layers. Eventually all the boo boos will literally disappear into the background. To speed up the drying process in between all those layers of paint, use a hair dryer.

Boo boos all covered and
the piece is ready for the next layer of color.

Friday, February 8, 2019

Dappled & Broken


Breyer's new "Malik"
sculpted by Sarah Mink. Customized and for Sale.

It's been a very busy week in my studio. Dapples have been the main focus this week as I completed two pieces. One dappled piece, a new Breyer Malik, is a grey dapple with lots of fading dappled areas. The other, a "Abrantes" resin, is a mulberry grey. Both were challenges and I walked away feeling as if I learned something new about color and patterning from each piece. One offered lessons on fading while the other offered lessons on individual hairing of the dappled pattern.

Malik is for sale. Click HERE for more info.


Abrantes Resin all dolled up.


More views of Abrantes.


Commission books are open.
Email at jenndanza@gmail.com


The other time spent this week was on restorations, especially this foal. She was in a state of woe and it took about two weeks total to get her back together. This is probably the most breaks in one piece Ive ever encountered in the studio. The most difficult part of this restoration was figuring out what broken piece to adhere first! She is all better now.

Japan china before restoration.


Same china after restorations


Although my restoration books are currently closed they will be opening back up at the end of the month.

For more information you can visit my restoration page on my website: Restorations by Jennifer ODonnell Danza

Tuesday, February 5, 2019

NaMoPaiMo 2019


Brigitte Eberl's "Cerberus" resin
waiting to get painted.

NaMoPaiMo 2019 has begun!
This is the model horse industry's time to come together and paint a horse and share their journeys! It is a time of being together as collectors and artists. Even if one has never painted a model horse before, the celebration of NaMoPaiMo is the time to start! Participants pick one model horse, a color, and they determine what they would like to achieve and then they start in on their project.

This year I have chosen another one of my nakid resins from my personal collection to paint and to explore color theory with and on. The Cerberus resin has been in my collection for a long time and I have always envisioned him as a dappled bay with very dark points. I never dove into painting him for two reasons. One, I never seem to have enough time to paint my own pieces and two, I was afraid Id mess him up. I had envisioned these lovely dapples running throughout his barrel and on his neck and I could never figure out how to make them look the way I was seeing them in my head. There aren't too many of this mold around and messing him up would be upsetting. But, NaMoPaiMo is about diving in and just doing it and learning. So, off I go....

If you'd like to learn more about NaMoPaiMo and join next year, check out the official Facebook page.

Friday, January 25, 2019

Restorations & Repair Studio: CLOSED

Piece visiting the studio
for full out restoration.


RESTORATION & REPAIR STUDIO
CLOSED until end of February 2019

Why?

THANK YOU all so much for your enthusiastic response to my restoration and repair services. At the present time I've had to close my studio to all new restorations and repairs for a short spell. I am doing this so I can properly focus on all that has come into my studio within the last 2 months and so that I can do an excellent job on all the pieces that need restoration.


I am currently being inundated with a barrage of emails, tweets, instagram messages and facebook notes from people about their restorations and repairs and I do appreciate all that is coming through, however, I cannot seem to get to all of them fast enough for people, nor can I keep straight where everything is coming from as many are sending the same note to me multiple times on multiple platforms and this is causing stress for me.


I want you to note that.....
I keep a pretty tight and disciplined schedule in my studio as I do have another job outside the studio which requires I quit all studio work by 2pm. Some days working from 7:30 am till 2 PM is just not enough time to create and although I try to answer emails on Mondays and Fridays, some Mondays and Fridays the creative bug just hits, or a tricky restoration gives into me and I continue working. I try not to let that happen as I know answering correspondence is very important. Being reminded that Im not doing a good job of this from potential clients in emails or PMs causes stress and closing the books until I can handle emails properly and handle what has come into the studio is best for me, for my current clients and for my potential clients.


Many don't understand that if I spend my entire mornings online answering everything and reviewing all the images that have come in from everyone then I have that much less time to paint commissions and restore. That in turn makes those waiting for their things to get finished and come back to them angry. So basically me trying to please everyone all at once is just making someone mad at me and making me miserable. :(
I am a one trick pony here. I have no assistant. No one else but me cataloging all coming in, fixing/painting, contacting, invoicing, quality checking, packing, shipping and then corresponding once again with tracking numbers.


So please understand I am closing the restoration books so I can catch up and not fall grossly behind which makes everyone stressed, even me. I anticipate reopening the restoration books the third week of February and my news members will receive notification of these openings first.
And if you were wondering, yes the image is of a Japan china that arrived broken in several places . This particular piece will take well over 2 weeks to complete. At the present time I am three days into just attaching the pieces and have one more piece to attach then I can start the actual restoration. Each piece is set against gravity then requires 24 hours to cure. Thats only ONE broken piece. I show you this piece so you can see how complex many of the pieces I receive can be. I cannot stress enough that if one wants super quick ASAP work then I am not the restoration artist for you. Its not that I am lazy or incompetent. I am thorough and each piece is handled like the fine art it is and some pieces, like this one, naturally require more time to complete.

Thank you for your time and your understanding.
~Jennifer

Huge issues with this piece.


Restoration once completed.

Saturday, January 19, 2019

Happy New Year

Goodbye Old Site

Happy New Year!

Every new year there are resolutions and promises to one's self. Promises to change aspects of life that aren't quite going as planned. For me, 2019 prompted a very heavy and serious decision about my online presence. Although Ive had a website online since 2000 the entire site went dead during my divorce and eventual move to a new state around 2010.

I had spent countless hours up until that point creating my site and updating it, continually tweaking the html. Then, life happened and the site fell very silent. Not having the time nor the means to update the site properly started to weigh heavily on me. Another year went by and another promise was made to myself and another resolution broken, but I kept promising myself I'd update the site. Then, the years just started to fly by and pile on...

2012, resolution broken.
2013, resolution broken.
2014, resolution broken.
2015, resolution broken.
2016, resolution broken.
2017, resolution broken.
2018, resolution broken.

Finally, in December of 2018 I was done breaking this promise to myself and took the issue firmly in my mind and hands and propped it right into the fire and started working on fixing this once and for all. I literally worked for four days straight turning this promise into a reality.


New site. Opening page
Visit: JENNDANZA.COM


New interior pages


Although I will miss my old site because it was my creation 100%, it served its purpose well and its time had come. The new site is lovely and so easy to update and its all mobile friendly! So many things have changed in the world of website creation since 2000 and one needs to stay on top of such things in the world of art, even if its just art on little model horses.

Overall, I'm very thrilled to unveil it and the best part is that every aspect of art that I dive into is in one spot. All my ceramics, all my landscape painting, all my illustrations and all my equine art are all on one site.

So if you get a chance definitely head on over to

jenndanza.com

and check out all the different portfolios!

And, to end this first blog post of 2019 I'd like to say my final farewell to an old friend......bye good friend. Thanks for all your help throughout the years.....

Last glance at the interior pages