
While this piece sits I have been diving into some base work. As I was going along with the base for a Lil Pumpkin piece I'll be offering soon, the painting of the tree stump took on the feel of a short visual tutorial so I quickly documented it. It might be of some help to someone struggling with painting props.
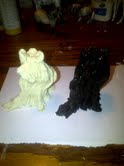
and a prepped tree

a dry brush
Start with the darkest color first. Paint the entire piece allowing paint to get into the crevices. This application is a wet application and applied as you would normally apply paint to an object. Let dry fully. At this stage the piece is not suppose to look good.
After the first layer has dried saturate a stiff brush with the next color. (Which should be lighter than the first.) Immediately blot this paint off the brush and onto a dry paper towel. Keep blotting till only a bit of paint comes off the brush and apply the color to the prop. Application should feel "dry" and not slick. Continue to add lighter colors in this fashion. Keep applying paint to the brush and blotting on clean sections of your paper towel. If you feel the colors aren't working or can't get a feel for the dry brush technique right off the bat just repaint the prop and start over. Use a hair dryer to dry in between layers.

Layers get lighter as you paint.

on one base


No comments:
Post a Comment